
DFM Part Two
At this point, we had decided to commit to two ideas that we had sketched from before: redesigning the back case of the pen to make it more ergonomic and allow for stronger grip, and implementing tools that could be used to clean the tip of the pen and break up any plastic that may have gotten stuck in the plastic tubing. We modeled the back case in closer detail (as detailed in the CAD/CAM section of our portfolio), and also created rough ideas of what we wanted our tools to look like, and we 3D printed all of these for our initial prototypes
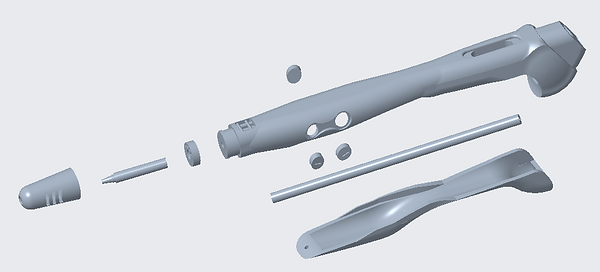
The assembly for our pen looked as such below, but we did not utilize all of these components of the file, but instead focused on the back case
I'm a paragraph. Click here to add your own text and edit me. It's easy.
Our first prototypes are shown below, and we will go more in-depth on the evolution of our prototypes in future pages:


From here, we created the first physical prototype, as seen below:


We used the Design of Experimentation concepts that we had learned in class to create a 22 factor experiment that would allow us to test truly how our changes had impacted the performance of the pen. On a piece of paper, we printed out the outline of a rectangle, and using both the grip case and the tools that we had printed, we tested how long it took us to trace the rectangle four times, and then after 30 seconds of cooling, how long it took us to remove the print from the paper. From this, we saw that the grip case did not have a significant effect on the efficiency of the pen, but the tools helped a large amount in separating the print from the paper. Our Design of Experiments results are shown below:
For the second time, we used aPriori to analyze the total cost of our product, this time, with our redesigned elements included. We were happy to see that adding the tools and grip case did not increase the cost by too much. Our second aPriori results are shown below:
Of course, our investment and fully burdened costs increased, but we felt that with the amount we could increase markup by with our new features, it would quickly become a worthwhile investment.
At this point, we compared our original and new products, and we felt that the changes we made were fairly noninvasive. One of the main objectives of our group for this project was to change the exterior components without tinkering with the more sensitive inner components, so when we looked at our two products, we were satisfied to see that we accomplished this. The changes we made did not put us in jeopardy of damaging our product.
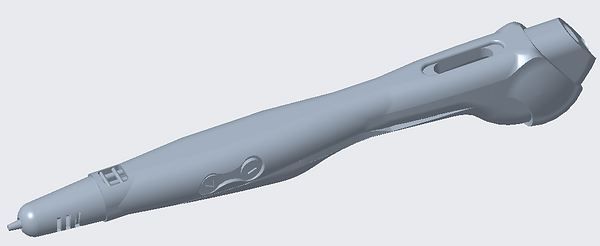
Our final product consisted of the same Tipeye 06A pen as we started with. However, a major change that we made to it was redesigning the back case of the pen to have a more stylized texture that added grip for the user. While our prototypes were still in plastic. For this, we imagined having the part of the case that will be handled to be made out of some elastomer such as silicone rubber. We felt that this variation in material would allow for stronger grip, similar to how many pens and pencils have grips for users.

Secondly, we created two tools for the pen that could be used to allow for simple user maintenance in order to make the use of the pen much smoother. One tool was designed to be thin enough to get into the plastic tubing and break up dried-up plastic or other debris that had possibly gotten stuck in there. The second tool that we made was primarily for scraping: scraping plastic off of the tip of the pen that had possibly gotten stuck there, or scraping underneath a print to get it off of the print bed, whatever form it may be in.
